Saturday 25 April 2015

Colour Mixing Activity

Teaching colour mixing is always fun and exciting! I love this colour mixing activity, and it's always a hit with my students. You will need: diluted blue, red and yellow food colouring, matchsticks  newspaper, pipettes and a the colour mixing chart template which you will find here

Follow the dot pattern on the colour mixing sheet using the food colouring- make sure your students have one pipette per colour!

Mix the colours together with a toothpick, if you start from the yellow and go in an clockwise direction you won't need to change toothpicks.

Gently place the paper towel over the colour mixing sheet and watch the colours form!

I love the results, a real colour wheel with no fuss!
Keep smiling!
Miss A

Tuesday 21 April 2015

Maths Make 10 Game

One thing I always try to do is differentiate my maths games so that all learners are being challenged at their individual level. Even though I have a straight year 3 class, I still have a very wide range of learning abilities! This activity helped me with that- same game, 3 variations to ensure all students are being challenged at a level suitable to them. I created this game for students to review their 'Rainbow Facts'. Rainbow facts are numbers that make 10, such as 9+1 or 7+3. Developing automaticity with addition facts is so important! If a students is able to instantly recall 7+3=10, they begin to develop efficient strategies for addition of other addition facts, such as the answer to 7+4 will be 1 more than 10.

There were 3 Islands to choose from; Make 5, make 10 or make 20 (obviously for those who were already fluent with their make 10 facts!). The students studied their 'Number Island' activity sheet and searched for groups of numbers that totalled the number they were looking for. They then circled these numbers.

I also encouraged students to use unifix blocks to represent their addition sums, as well as to ensure their grouped numbers totalled the number they were searching for!

You can download this activity for free HERE.

Interested in more fun and engaging make 10 maths games? Click HERE to check out my Rainbow Facts (Make 10) Bundle, available at my TPT store!
Keep Smiling!
Miss A

Sunday 19 April 2015

Writing Process Pencil Display

Don't you just love it when you come across a teaching strategy and you don't understand how you ever managed without it? That's exactly how I feel about my Writing Process Pencil!

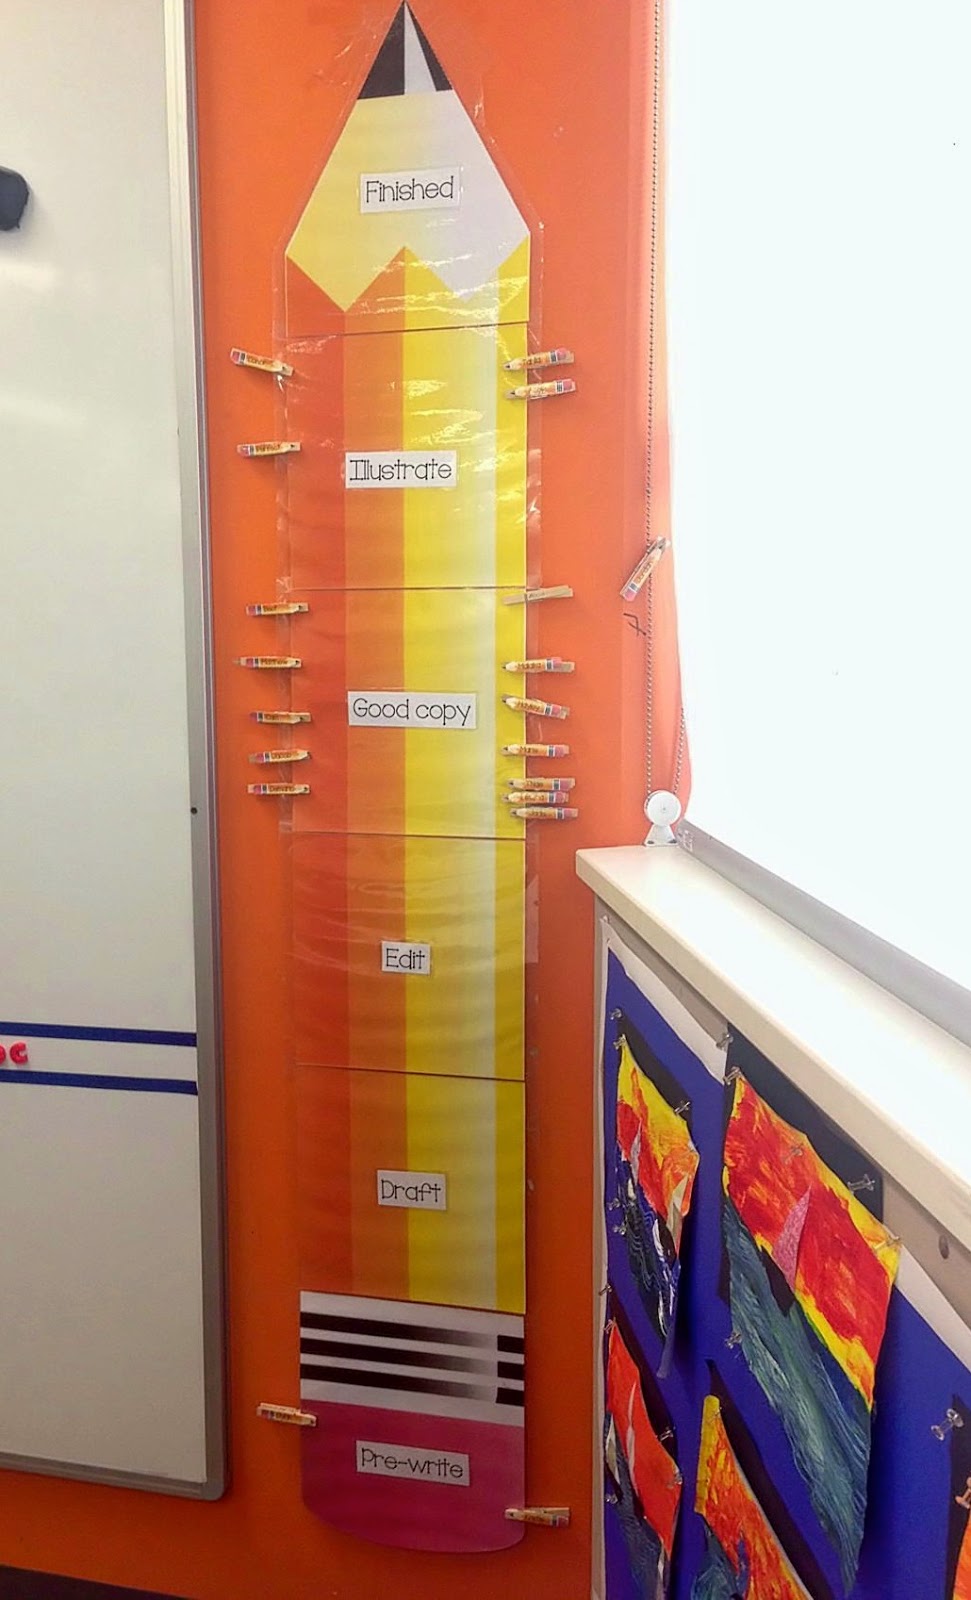
I got this idea from pinterest and thought I'd make my own version and give it a go. My students each have a pencil peg with their name on it. All pegs start on 'Pre-write' and then as they progress with their writing, they move their peg onto the next stage until they have reached the tip of the pencil which is the 'Finished' section. I LOVE using this for my writing tasks. Each section of the pencil has a different writing stage; Pre-write, Draft, Edit, Good Copy, Illustration and Finished.


Pre-Write
All the student's pencil pegs start on the 'Pre-Write' section. During this phase students brainstorm what they want to write about. They may also have a chat to the person next to them for some ideas and inspiration. This is also the time to write the title and date on their work.


Draft
Once students have completed the pre-write phase they move their pencil peg onto the 'Draft' section. This is when students begin their actual writing. Once they have finished their draft they need to re-read it to make sure it makes sense, then they can move their pencil peg up to the 'Edit' section.


Edit
During the 'Edit' phase, students come to me so I can check their spelling and grammar. I underline words that they have spelt incorrectly and ask them to either try and spell the word again, or check their dictionaries for the correct spelling. I also give them feedback on their work. The only time I will check students work is when they are right next to me. I've realised there's no point in checking and correcting work when the writer is not there- how often will my year 3's actually flick through previous writing work to see what errors had been corrected?!

Good Copy
After students have corrected all their errors, students move onto writing their good copy. I only use this section if I'm planning to put their writing on display, like my Earth Day writing task or my creative writing If I had a million dollars task. If they are just doing writing in their writing books, they skip this phase and move onto the illustration section


Illustration

I always get my students to draw a picture when they have finished their writing. It doesn't have to be a big fancy picture (although some students prefer it to be that way!) just something small and neat so that they can really value their work! Presentation is important!


Finished
This part speaks for itself- the student has finished their writing task!

I've found this pencil gives students accountability and really motivates them to stay on task- everyone wants their peg on the 'Finished' section by the end of the lesson! It also gives me an indication of where each student is at with their work. If a student has remained on the 'Pre-Write' section for a while, I'll ask if they need some assistance with their work. If I feel like someone is flying through the stages, I'll make sure they are on the right track
and their work is NEAT.

Keep smiling!
Miss A

Saturday 18 April 2015

Random Line Drawing Art Activity

It's amazing how much we underestimate children sometimes! This activity really proved that to me. I call this the 'Random Line Drawing' activity because your whole picture is based on just that- a random line! First I put a clean sheet of paper on the white board for the whole class to see. Using a black marker, I drew a random line. I then asked my students how they can turn this randomly drawn line into a work of art. If someone came up with a suggestion that I felt was creative enough, they would receive that sheet of paper and could start their art work. Then I would draw another random line and repeat this process until every student had a sheet of paper. I think this is a really good strategy, as the students who were still a but unsure got to hear all the suggestion from the other students, and I think this got their creative juices flowing! Some lines were curly, some were straight, some had sharp edges and some had soft edges. No two lines were the same! I was um-ing and ah-ing about doing this for quite sometime because I really did underestimate just how creative my students could be, but I'm glad I did it, they look fantastic and the students were super proud of their work!


Keep Smiling!
Miss A

Wednesday 15 April 2015

Near Doubles Neighbours

This week we started a new maths mental computation strategy: Near Doubles! I always teach near doubles when I have finished my unit on doubles as it builds on students proficiency with doubles facts.   Near doubles facts and doubles +1 or -1. For example, when solving a near doubles fact like 6+7, students can think double 6 plus 1 more. I use Ann Baker's Mental Computation Strategies which I LOVE! The improvement in fact fluency since I have started using her strategies is amazing! For those who haven't heard of her, you can check out her website here.

To introduce the topic we made our own near doubles neighbours! I gave each student a template of 3 houses side by side, and a doubles fact. The great thing about this lesson is you can be strategic about what double fact you give to which child. For example, I gave all the students who needed extending a double digit doubles fact. They wrote their doubles fact in the middle, and then on each side house they wrote the near doubles fact relating to the doubles fact.


After they had finished, they coloured their houses in and ta-da! A beautiful near doubles display! I think this is a great visual way for students to understand how near doubles work, and how efficient is it to use this strategy!

Check our my 'Near Doubles-Games and activities your students will love!' product on my TPT store HERE. Included in this product is the template I used for this activity as well as other engaging activities for you to teach near doubles in your classroom
Keep Smiling!
Miss A


Sunday 12 April 2015

Earth Day Project

This year I decided to combine my Earth Day and Harmony Day projects together! First we discussed how we could make the world a more harmonious place, for both the environment and humanity. I gave the students the story starter 'I can make the world a better place by…" and away they went! I was super impressed with all the amazing ideas they came up with :)

After students had finished their good copies, they moved onto their art activity. I love incorporating art in my writing lessons, it's a great way for students to be intrinsically motivated in the task! For this activity I used a shaving cream marbling technique to create Earths. Here's how to do it:

Trace a circle onto white cardstock and then cut it out.

Squirt about a handful of shaving cream on a piece of newspaper and spread it out until there is a thick layer covering a large area of the newspaper.

Squirt blue and green paint over the shaving cream, and then use the end of a thin paint brush to swirl the paint around. Make sure you don't over swirl! 

Press the paper circle firmly into the shaving cream and leave for about 30 seconds to 1 minute.

Very carefully, lift the paper circle and place it on some newspaper for about 5-10 minutes. 

Using a ruler, scrape the remaining foam off the work and ta-da! Your beautiful Earth is ready! I love the individual marbling patterns on them! Click here to watch a video with shaving cream marbling art from teachingwithtlc.com :)

Finally we used a large sheet of black paper for our background and cut out letters from newspapers and magazines to spell out 'Heal The World' on our work.


The students did such a brilliant job and were engaged the whole time, which is always a win! I think they look absolutely brilliant!!

Keep smiling!
Miss A